Spring Bean生命周期
1 前言
Bean是由Spring IoC容器实例化,组装和管理的对象,并且Spring Bean的生命周期完全由容器控制。这里所说的生命周期主要是指singleton bean,对于prototype的bean,Spring在创建好交给使用者后将不会管理后续的生命周期。
对于Spring Bean的生命周期,本文将会从以下两部分将:
- 生命周期的概要流程
- 扩展点的作用
2 Bean生命周期概述
我们知道对于普通的Java对象来说,它们的生命周期是:
- 创建阶段(Created)
- 应用阶段(In Use)
- 不可见阶段(Invisible)
- 不可达阶段(Unreachable)
- 收集阶段(Collected)
- 终结阶段(Finalized)
- 对象空间重分配阶段(De-allocated)
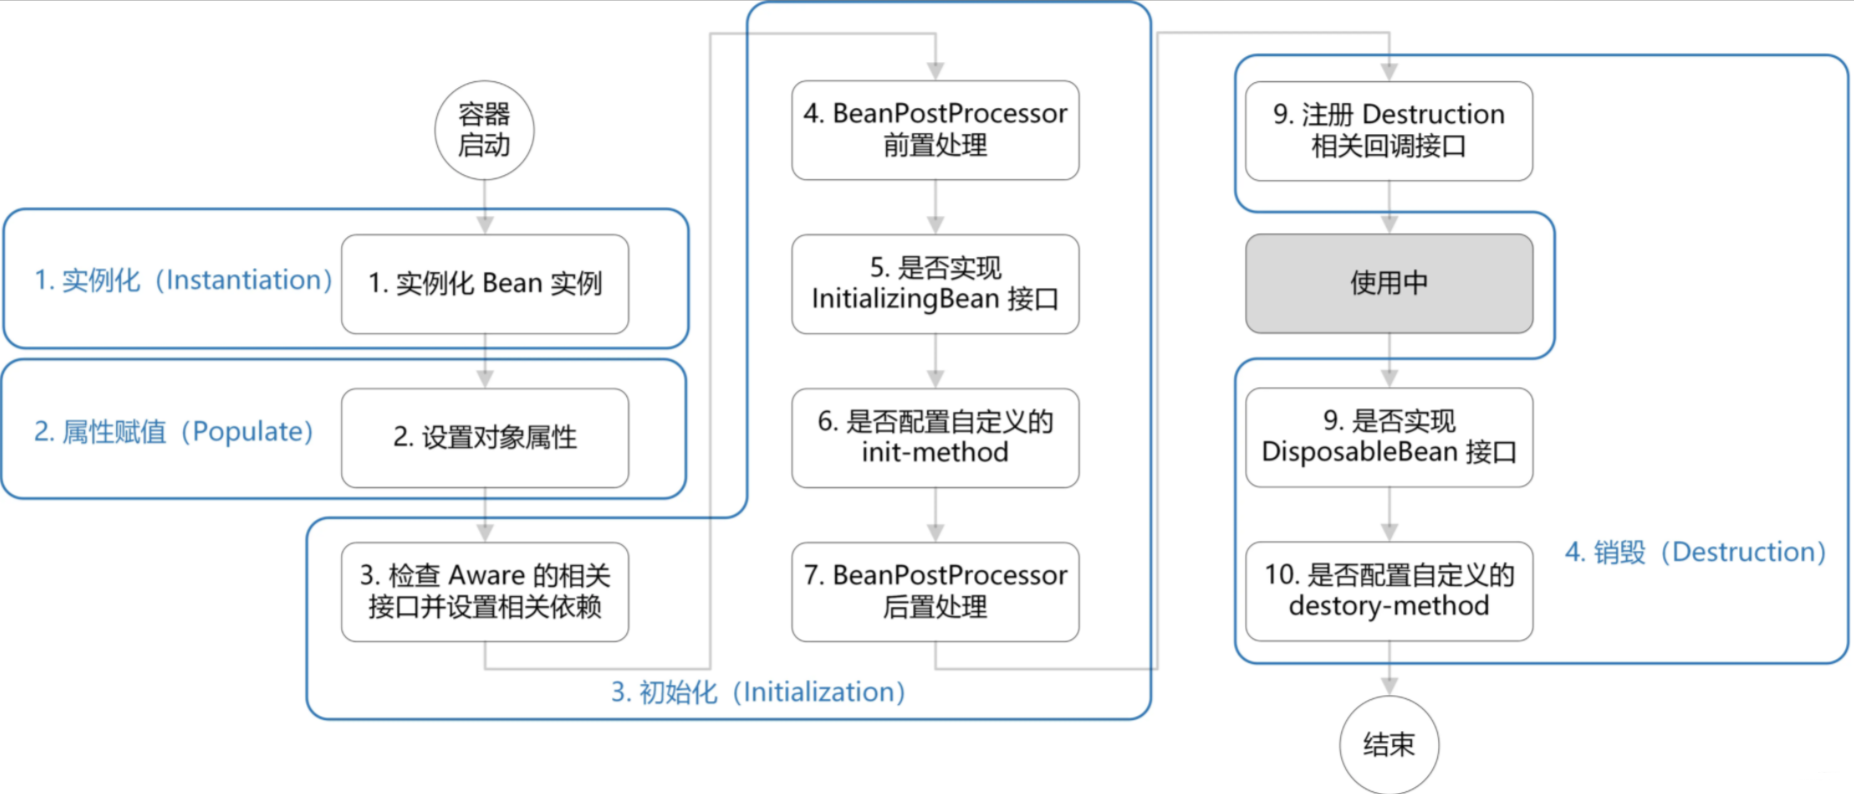
而对于Spring Bean来说,可以概述为4个阶段:
- 实例化(Instantiation)
- 属性赋值(Populate)
- 初始化(Initialization)
- 销毁(Destruction)

从图中分析
- 实例化:第1步,实例化一个bean对象
- 属性赋值:第2步,为bean对象设置相关属性和依赖
- 初始化:第 3~7 步,步骤较多,其中第 5、6 步为初始化操作,第 3、4 步为在初始化前执行,第 7 步在初始化后执行,该阶段结束,才能被用户使用;
- 销毁:第 8~10步,第8步不是真正意义上的销毁(还没使用呢),而是先在使用前注册了销毁的相关调用接口,为了后面第9、10步真正销毁 bean 时再执行相应的方法。
下面结合代码来直观的看下,
1 | |
由于初始化较复杂,包含了第3~7步,所以我们进到 initializeBean() 方法里具体看下其过程(注释的序号对应图中序号):
1 | |
在 invokInitMethods() 方法中会检查 InitializingBean 接口和 init-method 方法
销毁的过程也与其类似:
1 | |
这里额外说一下为什么JVM类加载是初始化再实例化,而Spring Bean是先实例化再初始化,有什么不同?(刚开始困扰了一会儿QAQ)
首先,要明确。类加载是JVM的基本过程,而Spring是在其上层的实现,这两个不在同个层次
在JVM中,初始化是在类级别的,主要功能是为静态成员赋值,执行静态代码块,执行<clinit>方法。实例化是指在堆区分配空间,执行
实例对象初始化,设置引用变量指向刚分配的内存地址(注意实例化也有一个初始化,这次初始化就会调用构造函数了,这是实例对象级别的) 在Spring中,实例化就是创造出一个bean对象了,包含了JVM的初始化和实例化;初始化就是给对象中的属性赋值,相当于人为操作。
3 扩展点的作用
3.1 Aware接口
若 Spring 检测到 bean 实现了 Aware 接口,则会为其注入相应的依赖。所以通过让bean 实现 Aware 接口,则能在 bean 中获得相应的 Spring 容器资源。
Spring 中提供的 Aware 接口有:
- BeanNameAware:注入当前 bean 对应 beanName;
- BeanClassLoaderAware:注入加载当前 bean 的 ClassLoader;
- BeanFactoryAware:注入 当前BeanFactory容器 的引用。
其代码实现如下:
1 | |
以上是针对 BeanFactory 类型的容器,而对于 ApplicationContext 类型的容器,也提供了 Aware 接口,只不过这些 Aware 接口的注入实现,是通过 BeanPostProcessor 的方式注入的,但其作用仍是注入依赖。
- EnvironmentAware:注入 Enviroment,一般用于获取配置属性;
- EmbeddedValueResolverAware:注入 EmbeddedValueResolver(Spring EL解析器),一般用于参数解析;
- ApplicationContextAware(ResourceLoader、ApplicationEventPublisherAware、MessageSourceAware):注入 ApplicationContext 容器本身。
1 | |
3.2 容器级的方法(BeanPostProcessor 一系列接口)

3.2.1 InstantiationAwareBeanPostProcessor 源码分析
从源码中发现InstantiationAwareBeanPostProcessor 是继承了 BeanPostProcessor
1 | |
1 | |
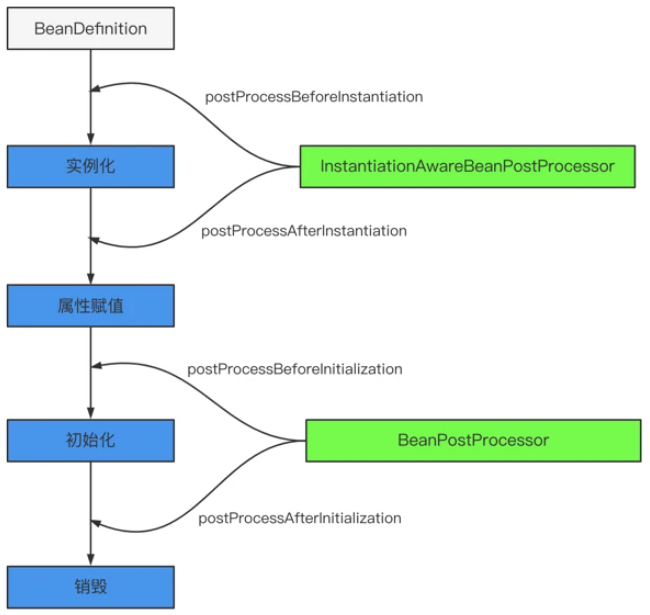
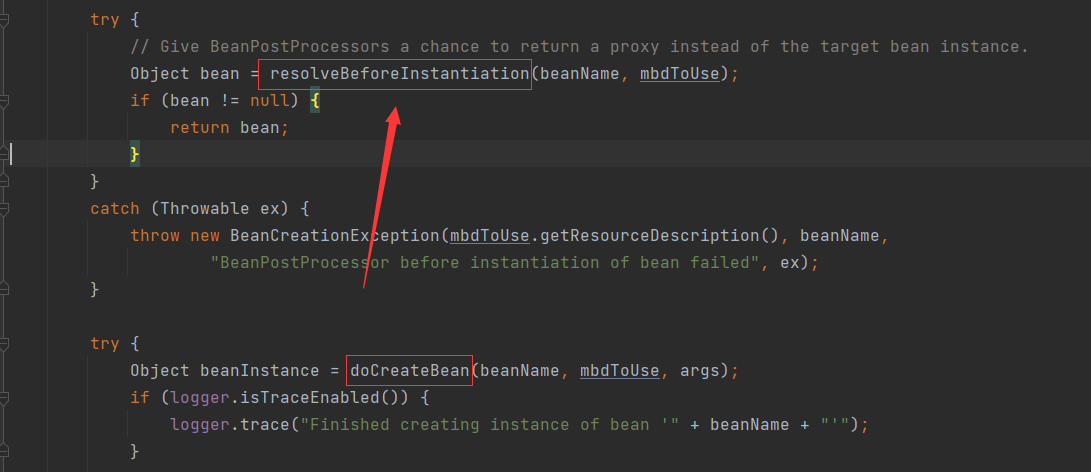
InstantiationAwareBeanPostProcessor#postProcessBeforeInstantiation调用点Object postProcessBeforeInstantiation(Class<?> beanClass, String beanName)
返回值:如果返回的不为null,那么后续的Bean的创建流程【实例化、初始化afterProperties】都不会执行,而是直接使用返回的快捷Bean,此时的正常执行顺序如下:
InstantiationAwareBeanPostProcessor接口中的postProcessBeforeInstantiation,在实例化之前调用。
BeanPostProcessor接口中的postProcessAfterInitialization,在实例化之后调用。
1
2
3
4
5
6
7
8
9
10
11
12
13
14
15
16
17
18
19
20
21
22
23
24
25
26
27
28
29
30
31/*
org.spring framework.beans . factory.support.AbstractAutowireCapableBeanFactory#resolveBeforeInstantiation
作用:在实例化之前解析是否有快捷创建的Bean,既是通过postProcessBeforeInstantiation返回的Bean
内部调用两个重要的方法:
1. applyBeanPostProcessorsBeforeInstantiation:
内部遍历调用postProcessBeforeInstantiation方法【在实例化之前调用J
2. applyBeanPostProcessorsAfterInitialization:
如果postProcessBeforeInstantiation方法返回了快捷的Bean,内部遍历调用postProcessBeforeInstantiation方法【在初始化之后调用】
*/
@Nullable
protected Object resolveBeforeInstantiation(String beanName, RootBeanDefinition mbd) {
Object bean = null;
if (!Boolean.FALSE.equals(mbd.beforeInstantiationResolved)) {
// Make sure bean class is actually resolved at this point.
if (!mbd.isSynthetic() && hasInstantiationAwareBeanPostProcessors()) {
Class<?> targetType = determineTargetType(beanName, mbd);
if (targetType != null) {
// 调用方法,内部遍历调用postProcessBeforeInstantiation方法【在实例化之前调用】
bean = applyBeanPostProcessorsBeforeInstantiation(targetType, beanName);
// 如果返回了快捷的Bean
if (bean != null) {
//如果postProcessBeforeInstantiation方法返回了快捷的Bean,
// 内部遍历调用 postProcessBeforeInstantiation方法【在初始化之后调用】
bean = applyBeanPostProcessorsAfterInitialization(bean, beanName);
}
}
}
mbd.beforeInstantiationResolved = (bean != null);
}
return bean;
}applyBeanPostProcessorsBeforeInstantiation
1
2
3
4
5
6
7
8
9
10
11
12
13
14
15
16/*
将 InstantiationAwareBeanPostProcessors 应用于指定的 bean 定义(按类和名称),
调用它们的 postProcessBeforeInstantiation 方法。任何返回的对象都将用作 bean,
而不是实际实例化目标 bean。来自后处理器的空返回值将导致目标 bean 被实例化。
*/
@Nullable
protected Object applyBeanPostProcessorsBeforeInstantiation(Class<?> beanClass, String beanName) {
// getBeanPostProcessorCache返回预过滤后处理器的内部缓存,如有必要,重新(重新)构建它。
for (InstantiationAwareBeanPostProcessor bp : getBeanPostProcessorCache().instantiationAware) {
Object result = bp.postProcessBeforeInstantiation(beanClass, beanName);
if (result != null) {
return result;
}
}
return null;
}applyBeanPostProcessorsAfterInitialization
1
2
3
4
5
6
7
8
9
10
11
12
13
14
15
16
17/*
作用:遍历调用postProcessAfterInitialization
*/
@Override
public Object applyBeanPostProcessorsAfterInitialization(Object existingBean, String beanName)
throws BeansException {
Object result = existingBean;
for (BeanPostProcessor processor : getBeanPostProcessors()) {
Object current = processor.postProcessAfterInitialization(result, beanName);
if (current == null) {
return result;
}
result = current;
}
return result;
}
InstantiationAwareBeanPostProcessor#postProcessAfterInstantiation调用点boolean postProcessAfterInstantiation(Object bean, String beanName) throws BeansException
正常情况下在实例化之后在执行populateBean之前调用
返回值:如果有指定的bean的时候返回false,那么后续的属性填充和属性依赖注入【populateBean】将不会执行,同时后续的postProcessPropertyValues将不会执行,但是初始化和BeanPostProcessor的仍然会执行。1
2
3
4
5
6
7
8
9
10
11
12
13
14
15
16
17
18
19
20
21
22
23
24
25
26protected void populateBean(String beanName, RootBeanDefinition mbd, @Nullable BeanWrapper bw) {
if (bw == null) {
if (mbd.hasPropertyValues()) {
throw new BeanCreationException(
mbd.getResourceDescription(), beanName, "Cannot apply property values to null instance");
}
else {
// Skip property population phase for null instance.
return;
}
}
// Give any InstantiationAwareBeanPostProcessors the opportunity to modify the
// state of the bean before properties are set. This can be used, for example,
// to support styles of field injection.
if (!mbd.isSynthetic() && hasInstantiationAwareBeanPostProcessors()) {
for (InstantiationAwareBeanPostProcessor bp : getBeanPostProcessorCache().instantiationAware) {
// 执行postProcessAfterInstantiation方法
if (!bp.postProcessAfterInstantiation(bw.getWrappedInstance(), beanName)) {
// 返回结果为false,那么赋值continuewithPropertyPopulation=false,表示不继续执行属性填充
return;
}
}
}
....
}
3.2.2 BeanPostProcessor 源码分析
initializeBean是该接口源码的入口
进入初始化接口:
1 | |
AbstractAutowireCapableBeanFactory#applyBeanPostProcessorsBeforeInitialization
1
2
3
4
5
6
7
8
9
10
11
12
13
14
15
16@Override
public Object applyBeanPostProcessorsBeforeInitialization(Object existingBean, String beanName)
throws BeansException {
Object result = existingBean;
// 1. 获取到所有的后置处理器 getBeanPostProcessors()
for (BeanPostProcessor processor : getBeanPostProcessors()) {
// 2. 调用后置处理器的方法
Object current = processor.postProcessBeforeInitialization(result, beanName);
if (current == null) {
return result;
}
result = current;
}
return result;
} 进入postProcessBeforeInitialization方法
1
2
3
4
5
6
7
8
9
10
11
12
13
14
15
16
17
18
19
20
21
22
23
24
25
26
27
28
29
30
31
32
33
34
35
36
37
38
39
40
41
42
43
44
45
46
47
48
49
50
51
52
53// org.springframework.context.support.ApplicationContextAwareProcessor#postProcessBeforeInitialization
@Override
@Nullable
public Object postProcessBeforeInitialization(Object bean, String beanName) throws BeansException {
if (!(bean instanceof EnvironmentAware || bean instanceof EmbeddedValueResolverAware ||
bean instanceof ResourceLoaderAware || bean instanceof ApplicationEventPublisherAware ||
bean instanceof MessageSourceAware || bean instanceof ApplicationContextAware ||
bean instanceof ApplicationStartupAware)) {
return bean;
}
AccessControlContext acc = null;
if (System.getSecurityManager() != null) {
acc = this.applicationContext.getBeanFactory().getAccessControlContext();
}
if (acc != null) {
AccessController.doPrivileged((PrivilegedAction<Object>) () -> {
invokeAwareInterfaces(bean);
return null;
}, acc);
}
else {
invokeAwareInterfaces(bean);
}
return bean;
}
private void invokeAwareInterfaces(Object bean) {
if (bean instanceof EnvironmentAware) {
((EnvironmentAware) bean).setEnvironment(this.applicationContext.getEnvironment());
}
if (bean instanceof EmbeddedValueResolverAware) {
((EmbeddedValueResolverAware) bean).setEmbeddedValueResolver(this.embeddedValueResolver);
}
if (bean instanceof ResourceLoaderAware) {
((ResourceLoaderAware) bean).setResourceLoader(this.applicationContext);
}
if (bean instanceof ApplicationEventPublisherAware) {
((ApplicationEventPublisherAware) bean).setApplicationEventPublisher(this.applicationContext);
}
if (bean instanceof MessageSourceAware) {
((MessageSourceAware) bean).setMessageSource(this.applicationContext);
}
if (bean instanceof ApplicationStartupAware) {
((ApplicationStartupAware) bean).setApplicationStartup(this.applicationContext.getApplicationStartup());
}
if (bean instanceof ApplicationContextAware) {
((ApplicationContextAware) bean).setApplicationContext(this.applicationContext);
}
}
ApplicationContextAwareProcessor#postProcessBeforeInitialization首先判断此 bean 是不是各种的Aware,如果是它列举的那几个 Aware 就获取 Bean 工厂的权限,可以向容器中导入相关的上下文环境,目的是为了 Bean 实例能够获取到相关的上下文,如果不是它列举的几个 Aware,那就调用invokeAwareInterfaces(bean),向容器中添加相关接口的上下文环境。
3.3 InitializingBean 和 init-method
InitializingBean 和 init-method 是 Spring 为 bean 初始化提供的扩展点。
InitializingBean接口 的定义如下:
1 | |
在 afterPropertiesSet() 方法写初始化逻辑。
指定 init-method 方法,指定初始化方法:
1 | |
DisposableBean 和 destory-method 与上述类似,就不描述了。
4. 总结
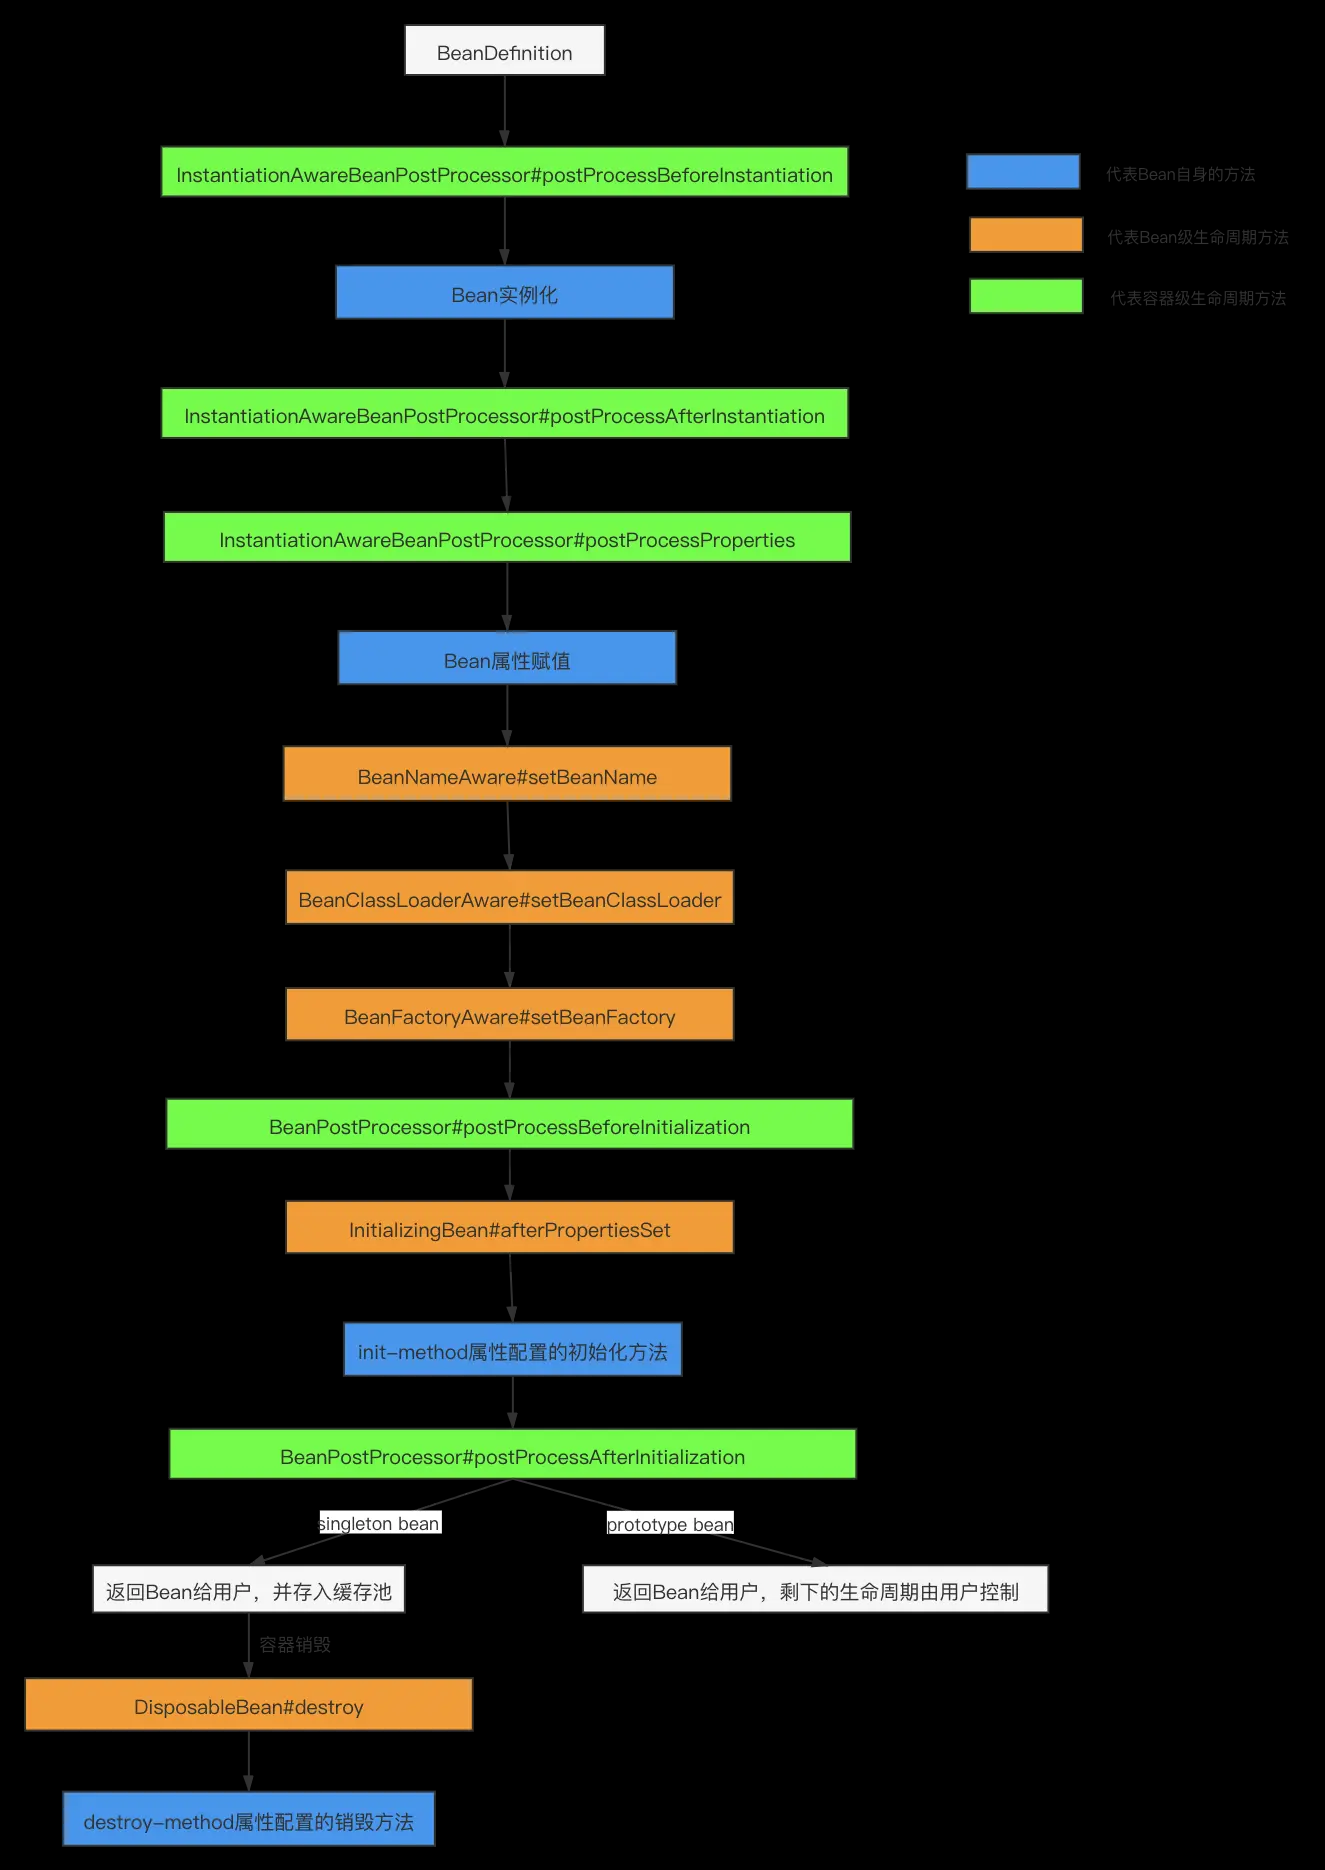
最后总结下如何记忆 Spring Bean 的生命周期:
- 首先是实例化、属性赋值、初始化、销毁这 4 个大阶段;
- 再是初始化的具体操作,有 Aware 接口的依赖注入、BeanPostProcessor 在初始化前后的处理以及 InitializingBean 和 init-method 的初始化操作;
- 销毁的具体操作,有注册相关销毁回调接口,最后通过DisposableBean 和 destory-method 进行销毁。

参考
如何记忆 Spring Bean 的生命周期 - 掘金 (juejin.cn)
一文读懂 Spring Bean 的生命周期 - SegmentFault 思否
(104条消息) JVM类 和 spring Bean 的实例化 和 初始化区别以及顺序_秋楓的博客-CSDN博客_spring实例化和初始化的区别